Wednesday, December 21, 2011


Scrapbook supplies ornaments

This kid-friendly ornament craft was inspired by a FamilyFun magazine article. My grandsons Will and Hugh and I spent a wonderful afternoon making them, and my sister-in-law Laurie made a few more several days later. The ornaments help dress up the Christmas tree and also make nifty gift wrap decorations.

Scrapbook paper
3-inch circle punch
Rickrack
Ribbon
Scissors
Tacky glue
Scrapbook gem stickers
Scotch tape
Paper clips

Cut out 3-inch circles of scrapbook paper with the punch.

Glue the ribbon and rickrack on the circle, using the tacky glue. Add gem stickers

Cut out a 1-inch square and tape it to the back of the ornament, positioning it to appear as the ornament top. Tape a paper clip to the back of the top for a hanger.

Cut out another 3-inch circle and glue it to the back of the ornament.

Monday, December 12, 2011


Make the ornament
1 spool of 28-gauge wire
40 round glass beads of one color
Wire nippers
1/2-inch wide satin ribbon

Cut one piece of wire to measure 12-inches long. Fold the wire in half.

Slide on 8 beads to the fold in the wire. Hold the first bead between your thumb and first finger and twist the wire to secure the bead at the fold.

Slide the next bead down the wire 1-inch and twist the wire in the same manner to secure the bead. Repeat with all remaining beads, twisting the folded wire together and positioning the beads on either side of the wire.

Repeat the last three steps four more times to create five pieces of beaded wire. Twist the ends of the wires together.

Place the ornament on a flat surface and position the beaded wire around the center twist, equally spaced. Tie a piece of satin ribbon to one beaded wire end for an ornament hanger. 


Make the bracelet

1 spool of 28-gauge wire
55 round glass beads of one color
Wire nippers
Hook and eye clasp

Slide all 55 glass beads on the wire without removing the wire from the spool. 

Wrap the loose end of the wire around the hook end of the clasp several times to secure the wire end. Cut the wire and file the end smooth.

Slide one bead 1/2 inch down the wire from the clasp hook. Hold the bead between your thumb and first finger and twist the wire to secure it. Repeat, sliding beads and twisting them to the wire every 1/2-inch until the bracelet fits around your wrist. 

End by wrapping 2 inches of the remaining wire around the eye clasp of the hook several times to secure it. Cut off any excess wire with the nippers.  

Wednesday, November 30, 2011


Crochet necklace

By chain stitching with a special type of sparkly yarn, you can crochet a holiday necklace that is perfect for parties and great for gifts. The yarn features metallic threads and is sold in specialty knitting supply stores. The crochet chain stitch is an uncomplicated pattern suitable for those who have never crocheted before. Wooden beads, used for the adjustable pull closure, are found at craft stores.

1 skein sparkly yarn
Crochet hook J
Tape measure
Scissors
Wooden bead

Make a loop with the yarn 8-inches from the yarn end. Insert the crochet hook into the loop and pull the yarn strand through, creating a chain stitch. Repeat, making enough chain stitches for a 12-inch length of chain. Cut the yarn 8-inches from the last chain and insert the yarn end through the last chain to knot the yarn.

Repeat the previous step four more times to make five yarn chains.

Gather the tails from one end of each yarn chain in your hand. Make a circle of the yarn and insert the tail ends in the circle, forming an overhand knot to connect the chains at the end of the chain pattern. Repeat with the tails on the opposite ends of the yarn chains.

Insert all tail ends into the pony bead. Make an overhand knot with all the tail ends at the ends of the yarn strands.

Slide the pony bead up and down the yarn strands to tighten and loosen the completed necklace.


Tuesday, November 22, 2011


Let’s craft an apple pie for Thanksgiving! I won first prize with this recipe. It is a yummy treat that has no cinnamon but lots of lemon zest.

Linda’s Prize Winning Apple Pie
Winner of the 2009 Rochester Art and Apples Pie Contest

Crust
2 1/2 cups flour
2 sticks butter
1 T sugar
1 t salt
1/2 cup cold water
Cut flour and butter together in food processor. Add water slowly until it forms a ball.

Filling
10 baking apples peeled, cored, and sliced 1/2 inch thick
4 pears, peeled, cored, and sliced 1/2 inch thick
4 tablespoons all-purpose flour
1 1/3 cups sugar, plus more for sprinkling
1/2 teaspoon freshly ground nutmeg
Juice and zest of 1 lemon
4 tablespoons unsalted butter, cut into small pieces
2 tablespoons heavy cream
Sugar for sprinkling

Preheat oven to 400 degrees. Line a baking sheet with a Silpat baking mat or parchment paper; set aside. Combine apples and pears in a large mixing bowl. Add flour, sugar, nutmeg, lemon juice, and zest, and mix. Add cranberries, and toss gently. Set aside.
On a lightly floured surface, roll out dough to a rough 18-inch circle about 1/8 inch thick. Line a 12-inch pie dish with the dough.
Transfer apple and pear mixture into pastry-lined pan. Dot the top with butter. Fold and overlap the pastry over the fruit. Brush pastry with cream. Sprinkle sugar lightly and evenly over the top of pie. Transfer to prepared baking sheet.
Bake for 20 minutes. Lower the oven temperature to 350 degrees; continue to bake until juices are bubbling, about 1 1/2 hours more


Wednesday, November 9, 2011

This chandelier looks great hanging from the ceiling in my hallway.  Capiz shells are translucent white shells that can be mimicked with surprising accuracy with doubled rounds of wax paper. The wax paper circles are connected together with the help of a sewing machine into long columns and tied to a lampshade form. A genuine capiz chandelier often retails for several thousand dollars. This one costs just a few dollars.

Supply list:
Old lampshade
Scissors
Ruler
1 roll waxed paper
Parchment paper
Iron
Circle cutter
Sewing machine
White thread
Existing ceiling light fixture
3 cup hooks

Remove all fabric from the old lampshade by cutting it with the scissors, leaving just the wire form.

Cut two 12-inch squares of waxed paper with the scissors. Sandwich the waxed paper pieces, waxy sides facing each other, between two pieces of parchment paper. Press over the papers with the iron gently to fuse the two pieces of waxed paper together.

Cut the waxed paper into 2-inch diameter circles with the circle cutter. Repeat the last two steps to make 250 wax paper circles.

Sew through one circle of waxed paper on the sewing machine, from edge to edge through the center of the circle. Without removing the circle from the sewing machine, place another wax paper circle directly under the first circle and sew through it. Repeat, adding eight more circles to make a length of 10 connected wax paper circles.

Cut the machine bobbin and top threads to a length of 4-inches long at the end of the connected length of circles.

Repeat the last two steps 19 more times to make 20 10-circle lengths.

Tie 20 lengths of connected wax paper circles to the small circle of the wire lampshade shade from the bobbin and top thread lengths. The lampshade will be attached upside down from the ceiling.

Make 10 five-circle lengths and tie them to the smaller circle of the lampshade.

Screw three cup hooks in the ceiling evenly spaced around the existing light fixture, and corresponding with the size of the large circle of the lampshade frame. Hook the large circle of the over the cup hooks to hang the completed chandelier.


Thursday, November 3, 2011

Etching is one of those things that seems really difficult ... when actually, it's really easy. Know how I do my glass etching? Stickers + glass etching cream. Really. The glass etching cream is this crazy chemical that turns glass from "clear and glossy" to "translucent and matte." It's pretty cool, and I've used it twice in the last three months.

ETCHING NUMBER ONE: Groomsmen gifts.

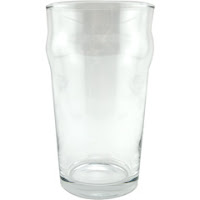
Mike loves beer. It's just that simple. So when he was thinking about gift ideas for his army of groomsmen, he naturally thought of gifts that HE would like. And guess what he likes? Beer glasses. Super-special-fancy ones that have a bulge on the side. Like this one.


"Imperial Pint Glass"


Mike also wanted each glass to be personalized, so I got a bunch of letter stickers and tacked those bad boys right on the side of the glass. Then, I painted the etching cream over it, let it sit for 20 minutes, and when I washed off the cream, voila. Personalized beer glasses. So easy.


ETCHING NUMBER TWO: Beer Trophy.

You know how they say, "if you're good at something, never do it for free?" I think I should take this to heart and start charging for my etchery services.

So, I was at work, talking to the guys, and - well, let me back up.

There is a beer brewing club at work. Yeah, true story. These guys love beer, they love brewing beer, and they also love competition. I mean, honestly, what's not to love there? This beer club meets once every season, and they all brew & bring a type of beer. (You know, an Ale, IPA, stout, whatever- the theme is chosen ahead of time and they all have to follow it.) At these club meetings, it's a big party and there is judging. As a former judge, let me tell you, being a beer judge is a pretty sweet gig. The beer judges rank the beers, and the highest ranked one is declared Winner and gets to pick the beer theme for next competition.

However... they decided there wasn't enough competition in this model. I mean, the judges are all laymen! They don't REALLY know beer! And often, they're drunk at the time of judging! So they decided a second trophy was needed. If the first trophy could be called the People's Choice Award, then they needed a Brewer's Choice Award, too. You know, so the real beer snobs could have a say in things.

OK, back to the beginning. I'm at work, talking to a few of these guys, and one of them mentions that they have a large glass mug from college that would be a great trophy. I suggest they etch it- they love it. One problem. Nobody knows how to etch. Perhaps I could etch it? I say, sure, why not. They tell me what they want it to say and I lug this giant stein home and begin etching.

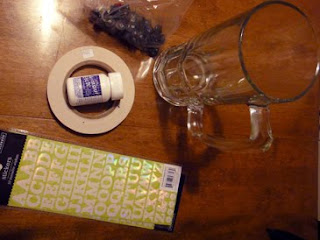
My supplies: ArmorEtch etching cream
Thin masking tape
Stickers
Comically oversized beer stein
Not pictured: brush.


These are the same tools I used for the first time around, so it was pretty easy to make this trophy for the beer guys.

I applied the stickers to the clean glass.
Fancy lettering is not girly when it references beer, I guess.

The next step was to apply the cream to the glass and let sit for 30 minutes. I actually let it sit for an hour- my bad- but the stein was fine. If anything, the etching was improved by this wait.


The cream is applied very thickly over the letters.
I used the masking tape to create boundaries for the etching.

At this point, I'm going to have to say, take my word for it- this glass was awesome. You'll have to take my word for it because I forgot to photograph the final product. I don't even have it anymore- I took it to work and they LOVED it. They actually reserved a conference room for the "unveiling ceremony." It was a pretty fun project, and so ridiculously easy to do- I totally recommend it as a great way to personalize glassware.

Tuesday, November 1, 2011

The purse, which I made for my favorite little girl, Nell, owes its distinctive textures to a novelty yarn that looks like fluffy frosting when knit. A satin ribbon closes the gathered top of the purse and serves as a strap. A video below shows you all the details.

Supplies
Skein dark brown worsted weight smooth yarn
Two size 8 knitting needles
Ruler
Skein pink fluffy novelty yarn, worsted weight
Scissors
Tapestry needle
Crochet hook size J
1-yard 1-inch wide pink satin ribbon

Cast on 40 stitches with the knitting needles and the brown yarn.

Knit 2 and purl 2 across the row. Repeat this row until the piece of work is 4 inches long.

Switch to the pink yarn and knit every row for 4 inches. Cast off. You will have a rectangle of brown and pink knitting.

Fold the brown part of the piece of work up in half lengthwise. Fold the pink and brown piece of work in half widthwise. Thread the tapestry needle with 24 inches of brown yarn and sew the cupcake purse bottom and side seams together. Thread the needle with the pink yarn and sew up the side seam of the cupcake purse frosting top. 

Thread the pink satin ribbon through the top edge of the cupcake frosting top, 1/4-inch from the top with the crochet hook. Tie the ends of the ribbon together in a bow. Pull the ribbon tight to close the purse. 


Katie is an engineer in Pittsburgh who crafts in her spare time. Her favorite crafts are functional, attractive, and highly personalized. Her crafts usually involve photos of friends. Her favorite craftster is Wendy Russel of the now-defunct show She's Crafty. She is least competent with woodworking and building large things, which is ironic since she is a civil engineer. (She also gets teased a lot, mostly by her husband, for being a terribly non-handy engineer.)


Linda is a newspaper reporter in Michigan who once majored in art and she has been an obsessive crafter her entire life. She aims to combining writing and crafting to create easy-to-understand instructions for her favorite projects. She is crazy about any type of craft that involves a needle – like knitting, crochet and quilting – but loves all artistic challenges. She lives by the rule ‘never throw anything out that could be used in a craft project,’ which makes for some cluttered closets. 
 

Copyright 2010 Urban Crafting.

Theme by WordpressCenter.com.
Blogger Template by Beta Templates.