Wednesday, January 18, 2012


            Knit up a ruffle scarf


An amazing new yarn is available that creates ruffles with a minimum of effort. If you know the basics of how to knit, this scarf can be stitched up in less than 2 hours. The self-ruffling yarn, found at specialty knitting supply stores, is a type of netting that is pulled apart during the knitting process. Watch the video to see exactly how it is done. An added benefit is that the ruffled knitting cast-on is super easy.

SUPPLIES
1 skein self-ruffling yarn
Two size 10 knitting needles

Pull apart a strand of yarn with your fingers and insert the knitting needles into the top edge of the yarn strand to create 8 stitches.

Knit every row, pulling the yarn strand apart and inserting the needles in the top edge of the netting. The process is not precise, but each stitch will be about one inch from the previous stitch.

Cast off. 

Sunday, January 1, 2012


Mosaics are less difficult than you might think. The flower pot is a memento of a family vacation at Cannon Beach in Oregon. The birdbath is a great addition to my patio. 


Make a mosaic birdbath or flowerpot


16-inch diameter clay pot saucer
Shells or broken dishes 
Cardboard pizza box
Hammer
White glue
Tile grout
Craft stick
Sea sponge

Place shells or dishes in the pizza box and close the lid. Hammer the shells or dishes to break them into medium sized pieces.

Attach the hand painted tile pieces to inside of the clay saucer or the outside of the flowerpot with white glue in a random pattern. Let the glue dry for 24 hours.

Mix the ceramic grout according to the manufacturer’s directions and cover the dish or shell pieces and the space between them on the inside of the saucer or the outside of the flowerpot.

Remove all excess grout with the damp sea sponge. Let the grout dry for 24 hours.

Make a stone column for the birdbath


Concrete blocks
Quick set cement
Rubber bucket
Rubber gloves
Pea pebbles

Arrange the concrete blocks into a formation in the site desired for the stone column.

Mix the cement with water in the rubber bucket until the cement is the consistency of oatmeal.

Put on the rubber gloves and add mud-pie sized globs of cement to the sides of the column. Push the flat sides of the pea pebbles into the wet cement in a decorative pattern. Repeat on all sides of the decorative column.

Wednesday, December 21, 2011


Scrapbook supplies ornaments

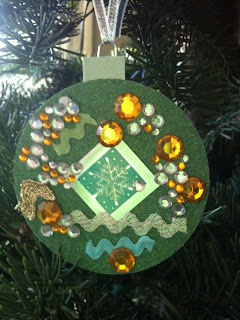
This kid-friendly ornament craft was inspired by a FamilyFun magazine article. My grandsons Will and Hugh and I spent a wonderful afternoon making them, and my sister-in-law Laurie made a few more several days later. The ornaments help dress up the Christmas tree and also make nifty gift wrap decorations.

Scrapbook paper
3-inch circle punch
Rickrack
Ribbon
Scissors
Tacky glue
Scrapbook gem stickers
Scotch tape
Paper clips

Cut out 3-inch circles of scrapbook paper with the punch.

Glue the ribbon and rickrack on the circle, using the tacky glue. Add gem stickers

Cut out a 1-inch square and tape it to the back of the ornament, positioning it to appear as the ornament top. Tape a paper clip to the back of the top for a hanger.

Cut out another 3-inch circle and glue it to the back of the ornament.

Monday, December 12, 2011


Make the ornament
1 spool of 28-gauge wire
40 round glass beads of one color
Wire nippers
1/2-inch wide satin ribbon

Cut one piece of wire to measure 12-inches long. Fold the wire in half.

Slide on 8 beads to the fold in the wire. Hold the first bead between your thumb and first finger and twist the wire to secure the bead at the fold.

Slide the next bead down the wire 1-inch and twist the wire in the same manner to secure the bead. Repeat with all remaining beads, twisting the folded wire together and positioning the beads on either side of the wire.

Repeat the last three steps four more times to create five pieces of beaded wire. Twist the ends of the wires together.

Place the ornament on a flat surface and position the beaded wire around the center twist, equally spaced. Tie a piece of satin ribbon to one beaded wire end for an ornament hanger. 


Make the bracelet

1 spool of 28-gauge wire
55 round glass beads of one color
Wire nippers
Hook and eye clasp

Slide all 55 glass beads on the wire without removing the wire from the spool. 

Wrap the loose end of the wire around the hook end of the clasp several times to secure the wire end. Cut the wire and file the end smooth.

Slide one bead 1/2 inch down the wire from the clasp hook. Hold the bead between your thumb and first finger and twist the wire to secure it. Repeat, sliding beads and twisting them to the wire every 1/2-inch until the bracelet fits around your wrist. 

End by wrapping 2 inches of the remaining wire around the eye clasp of the hook several times to secure it. Cut off any excess wire with the nippers.  

Wednesday, November 30, 2011


Crochet necklace

By chain stitching with a special type of sparkly yarn, you can crochet a holiday necklace that is perfect for parties and great for gifts. The yarn features metallic threads and is sold in specialty knitting supply stores. The crochet chain stitch is an uncomplicated pattern suitable for those who have never crocheted before. Wooden beads, used for the adjustable pull closure, are found at craft stores.

1 skein sparkly yarn
Crochet hook J
Tape measure
Scissors
Wooden bead

Make a loop with the yarn 8-inches from the yarn end. Insert the crochet hook into the loop and pull the yarn strand through, creating a chain stitch. Repeat, making enough chain stitches for a 12-inch length of chain. Cut the yarn 8-inches from the last chain and insert the yarn end through the last chain to knot the yarn.

Repeat the previous step four more times to make five yarn chains.

Gather the tails from one end of each yarn chain in your hand. Make a circle of the yarn and insert the tail ends in the circle, forming an overhand knot to connect the chains at the end of the chain pattern. Repeat with the tails on the opposite ends of the yarn chains.

Insert all tail ends into the pony bead. Make an overhand knot with all the tail ends at the ends of the yarn strands.

Slide the pony bead up and down the yarn strands to tighten and loosen the completed necklace.


Tuesday, November 22, 2011


Let’s craft an apple pie for Thanksgiving! I won first prize with this recipe. It is a yummy treat that has no cinnamon but lots of lemon zest.

Linda’s Prize Winning Apple Pie
Winner of the 2009 Rochester Art and Apples Pie Contest

Crust
2 1/2 cups flour
2 sticks butter
1 T sugar
1 t salt
1/2 cup cold water
Cut flour and butter together in food processor. Add water slowly until it forms a ball.

Filling
10 baking apples peeled, cored, and sliced 1/2 inch thick
4 pears, peeled, cored, and sliced 1/2 inch thick
4 tablespoons all-purpose flour
1 1/3 cups sugar, plus more for sprinkling
1/2 teaspoon freshly ground nutmeg
Juice and zest of 1 lemon
4 tablespoons unsalted butter, cut into small pieces
2 tablespoons heavy cream
Sugar for sprinkling

Preheat oven to 400 degrees. Line a baking sheet with a Silpat baking mat or parchment paper; set aside. Combine apples and pears in a large mixing bowl. Add flour, sugar, nutmeg, lemon juice, and zest, and mix. Add cranberries, and toss gently. Set aside.
On a lightly floured surface, roll out dough to a rough 18-inch circle about 1/8 inch thick. Line a 12-inch pie dish with the dough.
Transfer apple and pear mixture into pastry-lined pan. Dot the top with butter. Fold and overlap the pastry over the fruit. Brush pastry with cream. Sprinkle sugar lightly and evenly over the top of pie. Transfer to prepared baking sheet.
Bake for 20 minutes. Lower the oven temperature to 350 degrees; continue to bake until juices are bubbling, about 1 1/2 hours more


Wednesday, November 9, 2011

This chandelier looks great hanging from the ceiling in my hallway.  Capiz shells are translucent white shells that can be mimicked with surprising accuracy with doubled rounds of wax paper. The wax paper circles are connected together with the help of a sewing machine into long columns and tied to a lampshade form. A genuine capiz chandelier often retails for several thousand dollars. This one costs just a few dollars.

Supply list:
Old lampshade
Scissors
Ruler
1 roll waxed paper
Parchment paper
Iron
Circle cutter
Sewing machine
White thread
Existing ceiling light fixture
3 cup hooks

Remove all fabric from the old lampshade by cutting it with the scissors, leaving just the wire form.

Cut two 12-inch squares of waxed paper with the scissors. Sandwich the waxed paper pieces, waxy sides facing each other, between two pieces of parchment paper. Press over the papers with the iron gently to fuse the two pieces of waxed paper together.

Cut the waxed paper into 2-inch diameter circles with the circle cutter. Repeat the last two steps to make 250 wax paper circles.

Sew through one circle of waxed paper on the sewing machine, from edge to edge through the center of the circle. Without removing the circle from the sewing machine, place another wax paper circle directly under the first circle and sew through it. Repeat, adding eight more circles to make a length of 10 connected wax paper circles.

Cut the machine bobbin and top threads to a length of 4-inches long at the end of the connected length of circles.

Repeat the last two steps 19 more times to make 20 10-circle lengths.

Tie 20 lengths of connected wax paper circles to the small circle of the wire lampshade shade from the bobbin and top thread lengths. The lampshade will be attached upside down from the ceiling.

Make 10 five-circle lengths and tie them to the smaller circle of the lampshade.

Screw three cup hooks in the ceiling evenly spaced around the existing light fixture, and corresponding with the size of the large circle of the lampshade frame. Hook the large circle of the over the cup hooks to hang the completed chandelier.


Copyright 2010 Urban Crafting.

Theme by WordpressCenter.com.
Blogger Template by Beta Templates.